Introduction
According to the people who designed it, OData (the Open Data Protocol) is
“the best way to Rest”.
OData is essential, a way to try and standardize REST. It’s an open protocol that allows the creation and consumption of queryable and interoperable RESTful APIs in a simple and standard way. It describes things such as which HTTP method to use for which type of request, which status codes to return when, and also URL conventions. It includes information on querying data — filtering and paging but also calling custom functions and actions and more.
Query options
The following are the OData query options that ASP.NET Core WebAPI supports:
- $orderby
Sorts the fetched record in a particular order like ascending or descending.
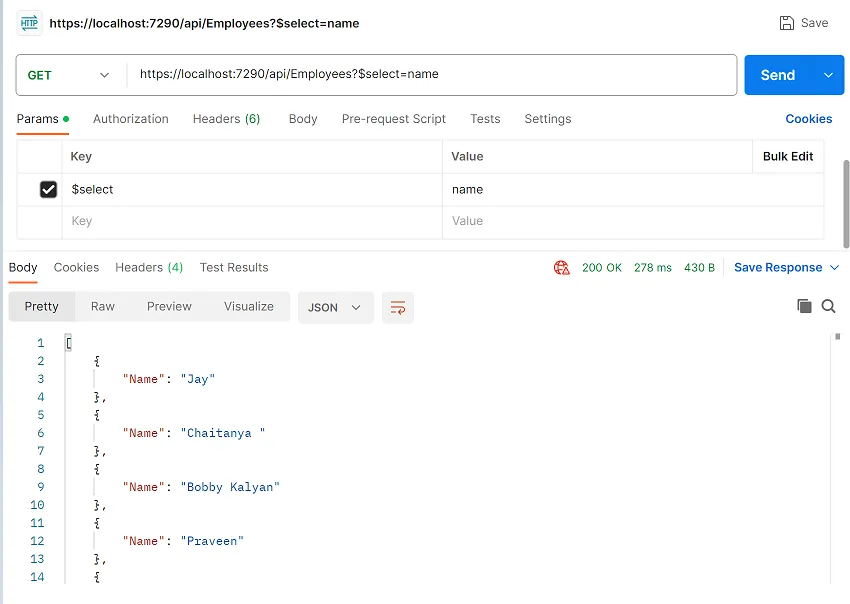
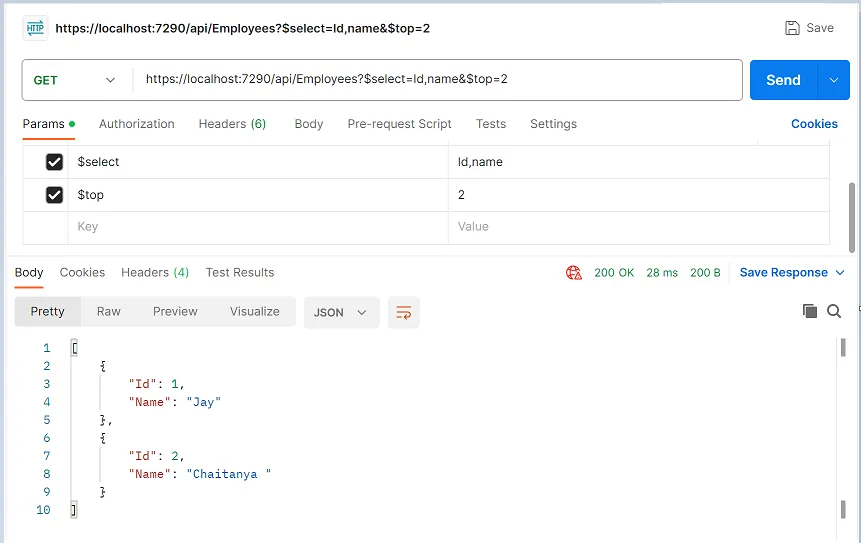
- $select
Selects the columns or properties in the result set. Specifies which all attributes or properties to include in the fetched result.
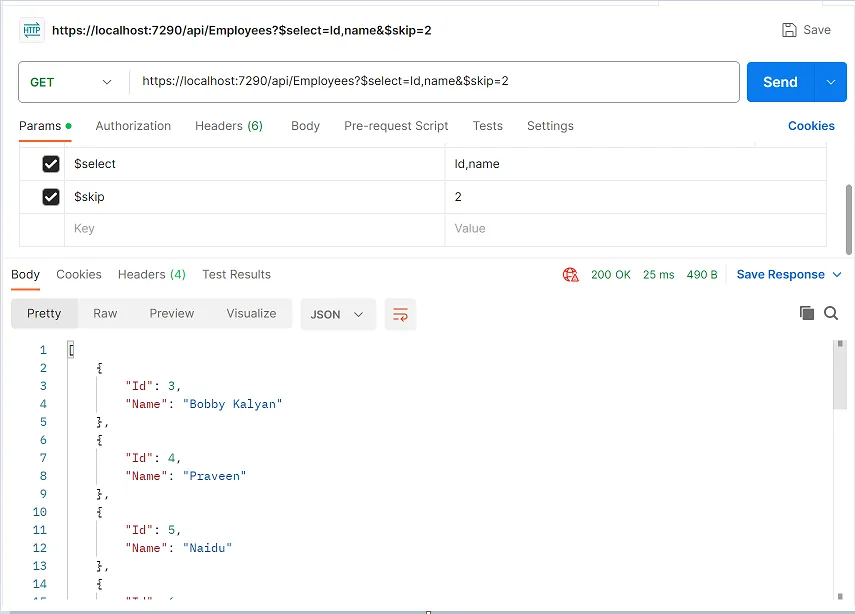
- $skip
Used to skip the number of records or results. For example, I want to skip the first 100 records from the database while fetching complete table data, then I can make use of $skip.
- $top
Fetches only top n records. For example, I want to fetch the top 10 records from the database, then my particular service should be OData enabled to support the $top query option.
- $expand
Expands the related domain entities of the fetched entities.
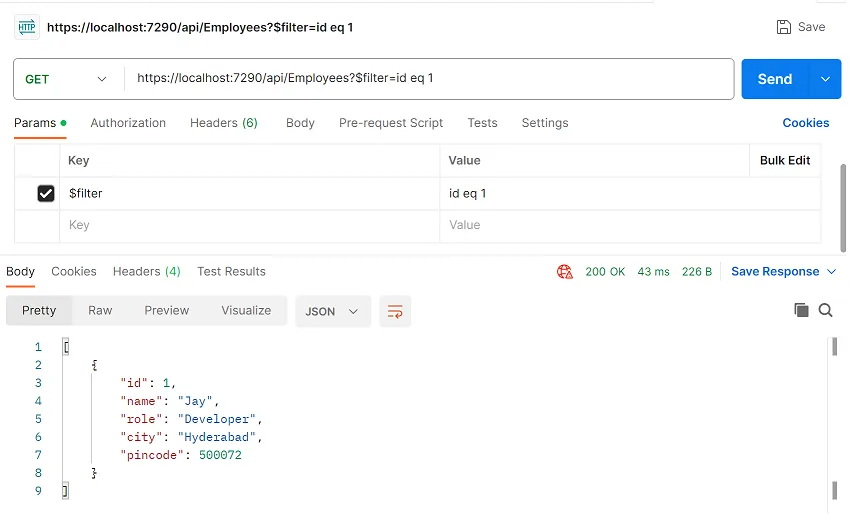
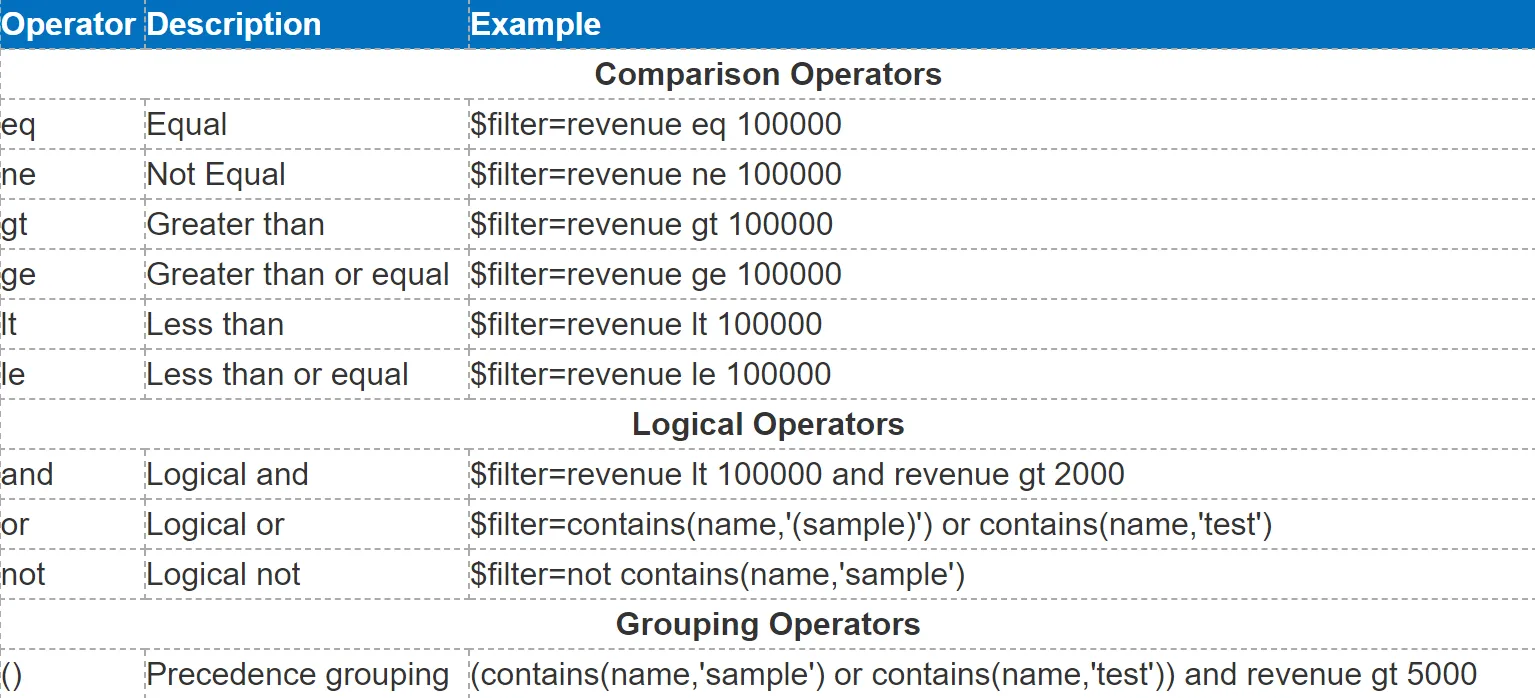
- $filter
Filters the result set based on certain conditions, it is like where clause of LINQ. For example, I want to fetch the records of 50 students who have scored more than 90% marks, and then I can make use of this query option.
- $inlinecount
This query option is mostly used for pagination on the client-side. It tells the count of total entities fetched from the server to the client.
Prerequisites
- SDK — .Net 8.0
- Tool — Visual Studio 2022
Setup solution
Visual Studio latest version is necessary to create the ASP.NET Core 8.0 web API or application. So, Let’s select the “ASP.NET Core Web API” project template in the following dialog to create the skeleton of the project.
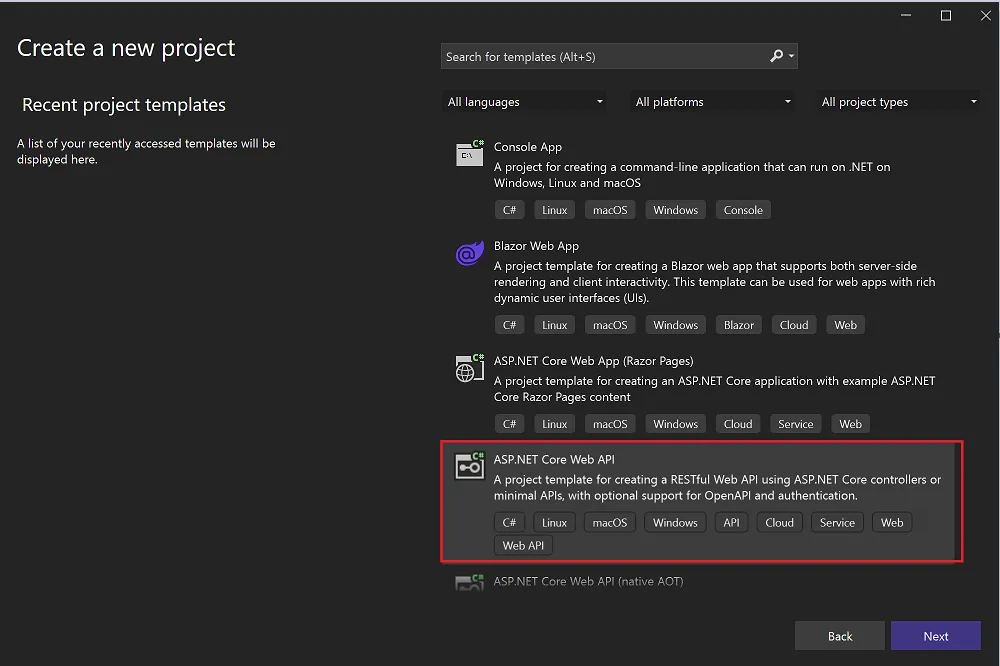
Click the “Next” button, then in the Additional information dialog, Select “.NET 8.0 template” for simplicity as below.
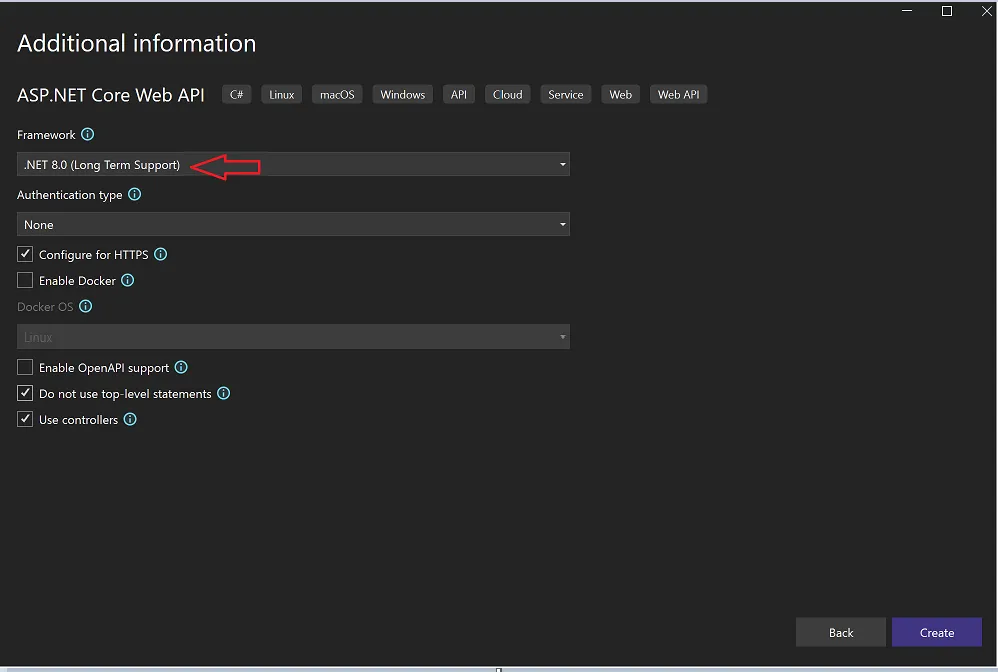
Click the “Create” button, we will get an empty ASP.NET Core Web API Project.
Install the NuGet package
The first thing to install is to install the ASP.NET Core OData Nuget package and also we need the ASP.NET Core NewtonsoftJson for input and output format parameters.
In the solution explorer, Right-click on the project and select the Manage NuGet Packages where you can find those packages in the browse section. See the below picture.

Add the model class
Right-click on the solution project in the solution explorer, from the popup menu, select Add > New Folder. Name the folder as Models. Add the following classes into the Models folder: we use the POCOs (Plain Old CLR Object) class to represent Employee model.
Employee.cs
namespace OData_API_Dotnet8.Models

{

    public class Employee

    {

        public int Id { get; set; }

        public string? Name { get; set; }

        public string? Role { get; set; }

        public string? City { get; set; }

        public int Pincode { get; set; }

    }

}
Create a business logic for Employee service
Right-click on the solution project in the solution explorer, from the popup menu, select Add > New Folder. Name the folder as Services. Add the EmployeeService class in which our actual business logic comes into the picture. Since I have not used any Database operations in this project, I have added static data to fetch the values from the List and one more method to fetch all the Details from the created list.
EmployeeService.cs
using OData_API_Dotnet8.Models;


namespace OData_API_Dotnet8.Services

{

    public class EmployeeService

    {

        public List<Employee> CreateData()

        {

            List<Employee> Employees = new(); // C# 9 Syntax


            Employees.Add(new Employee { Id = 1, Name = "Jay", Role = "Developer", City = "Hyderabad", Pincode = 500072 });

            Employees.Add(new Employee { Id = 2, Name = "Chaitanya ", Role = "Developer", City = "Bangalore", Pincode = 500073 });

            Employees.Add(new Employee { Id = 3, Name = "Bobby Kalyan", Role = "Developer", City = "Chennai", Pincode = 500074 });

            Employees.Add(new Employee { Id = 4, Name = "Praveen", Role = "Developer", City = "Vizag", Pincode = 500075 });

            Employees.Add(new Employee { Id = 5, Name = "Naidu", Role = "Developer", City = "Cochin", Pincode = 500076 });

            Employees.Add(new Employee { Id = 6, Name = "Yateesh", Role = "Developer", City = "Tirupati", Pincode = 500077 });

            Employees.Add(new Employee { Id = 7, Name = "Priyanka", Role = "Developer", City = "Khammam", Pincode = 500064 });

            Employees.Add(new Employee { Id = 8, Name = "Jisha", Role = "QA", City = "Kurnool", Pincode = 500078 });

            Employees.Add(new Employee { Id = 9, Name = "Aravind", Role = "QA", City = "Anakapalli", Pincode = 500214 });

            Employees.Add(new Employee { Id = 10, Name = "Manikanta", Role = "QA", City = "Tuni", Pincode = 500443 });

            Employees.Add(new Employee { Id = 11, Name = "Chinna", Role = "QA", City = "Srikakulam", Pincode = 500534 });

            Employees.Add(new Employee { Id = 12, Name = "Samuel", Role = "QA", City = "Bhimavaram", Pincode = 500654 });

            Employees.Add(new Employee { Id = 13, Name = "John", Role = "QA", City = "Kharagpur", Pincode = 5000765 });

            Employees.Add(new Employee { Id = 14, Name = "Edward", Role = "QA", City = "Mumbai", Pincode = 5000224 });

            Employees.Add(new Employee { Id = 15, Name = "Nihaan", Role = "QA", City = "Mangalore", Pincode = 500965 });

            return Employees;

        }


        public List<Employee> GetEmployees() => CreateData().ToList();

    }

}
So will be querying the data from that list to get the response as JSON.
Register services through Dependency Injection (DI) and also register OData services
ASP.NET Core OData requires some services registered ahead to provide its functionality. The library provides an extension method called “AddOData()” to register the required OData services through the built-in dependency injection. In order to work with OData, we need the Newtonsoft Json services needs to inject into the AddControllers(). So, add the following codes into the “ConfigureServices” method in the “Startup” class,
Program.cs
using Microsoft.AspNetCore.OData;

using Microsoft.OData.Edm;

using Microsoft.OData.ModelBuilder;

using OData_API_Dotnet8.Models;

using OData_API_Dotnet8.Services;


namespace OData_API_Dotnet8

{

    public class Program

    {

        static IEdmModel GetEdmModel()

        {

            ODataConventionModelBuilder builder = new();

            builder.EntitySet<Employee>("Employees");

            return builder.GetEdmModel();

        }

        public static void Main(string[] args)

        {

            var builder = WebApplication.CreateBuilder(args);


            // Add services to the container.


            builder.Services.AddControllers().AddOData(opt => opt.AddRouteComponents("v1", GetEdmModel()).Filter().Select().Expand().Count().OrderBy());


            builder.Services.AddScoped<EmployeeService>();


            var app = builder.Build();


            // Configure the HTTP request pipeline.


            app.UseHttpsRedirection();


            app.UseAuthorization();


            app.MapControllers();


            app.Run();

        }

    }

}
Create an empty API Controller to implement the GET method under EmployeeController and here EnableQuery attribute enables an endpoint to have OData Capabilities.
EmployeesController.cs
using Microsoft.AspNetCore.Cors;

using Microsoft.AspNetCore.Http;

using Microsoft.AspNetCore.Mvc;

using Microsoft.AspNetCore.OData.Query;

using OData_API_Dotnet8.Services;


namespace OData_API_Dotnet8.Controllers

{

    [Route("api/[controller]")]

    [ApiController]

    public class EmployeesController : ControllerBase

    {

       private EmployeeService _employeeService;

        public EmployeesController(EmployeeService employeeService)

        {

                _employeeService = employeeService;

        }

        [EnableQuery]

        public IActionResult Get()

        {

            return Ok(_employeeService.GetEmployees());

        }

    }

}
Let’s run the code and test with Postman.
$select
$skip
$top
$filter
Standard filter operators
Standard query functions
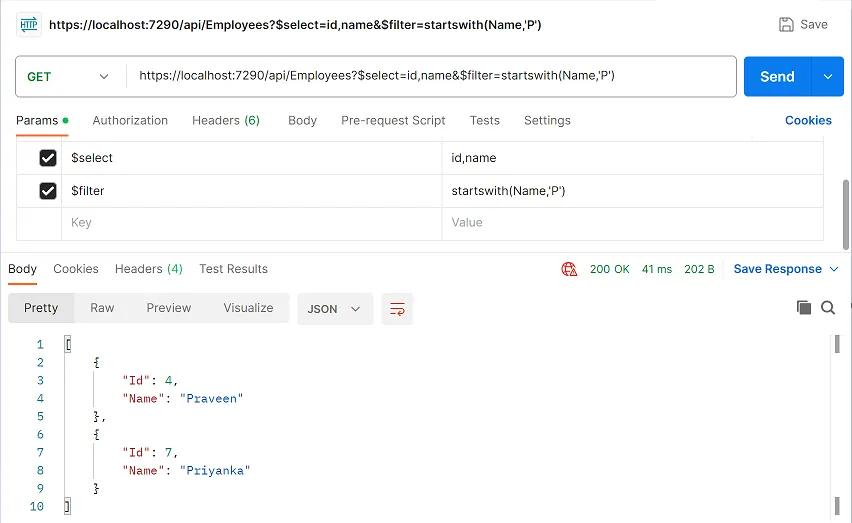
The web API supports these standard OData string query functions.

$filter — startswith
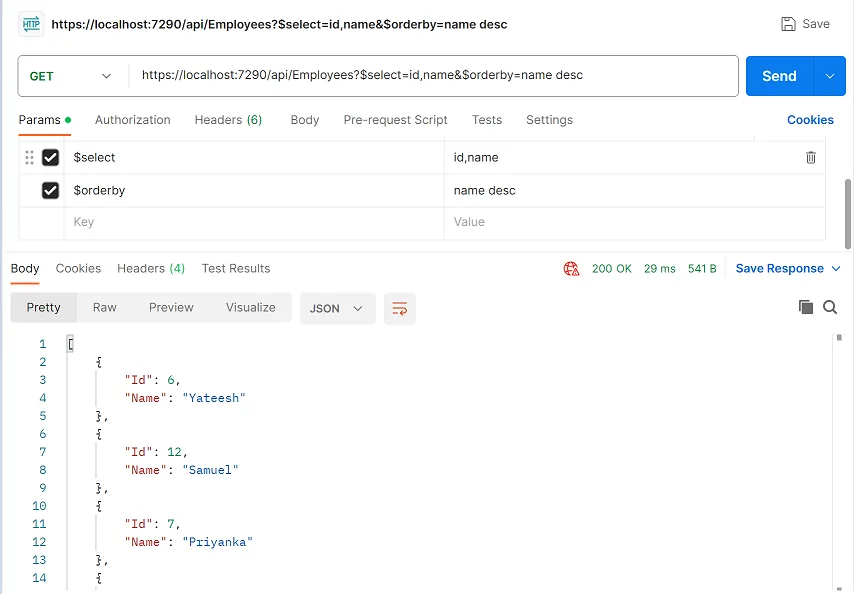
$orderby
Paging
You can create paging enabled endpoint which means if you have a lot of data on a database, and the requirement is that client needs to show the data like 10 records per page. So it is advisable that the server itself should send those 10 records per request so that the entire data payload does not travel on the network. This may also improve the performance of your services.
Let’s suppose you have 10000 records on the database, so you can enable your endpoint to return 10 records and entertain the request for the initial record and number of records to be sent. In this case, the client will make a request every time for next set of records fetch pagination option is used or the user navigates to the next page. To enable paging, just mention the page count at the [Queryable] attribute.
For e.g. [Queryable(PageSize = 5)]
Need to add the pagesize in the attribute
EmployeeController.cs
[EnableQuery(PageSize = 5)]

public IActionResult Get() => Ok(_employeeService.GetEmployees());
Query options constraints
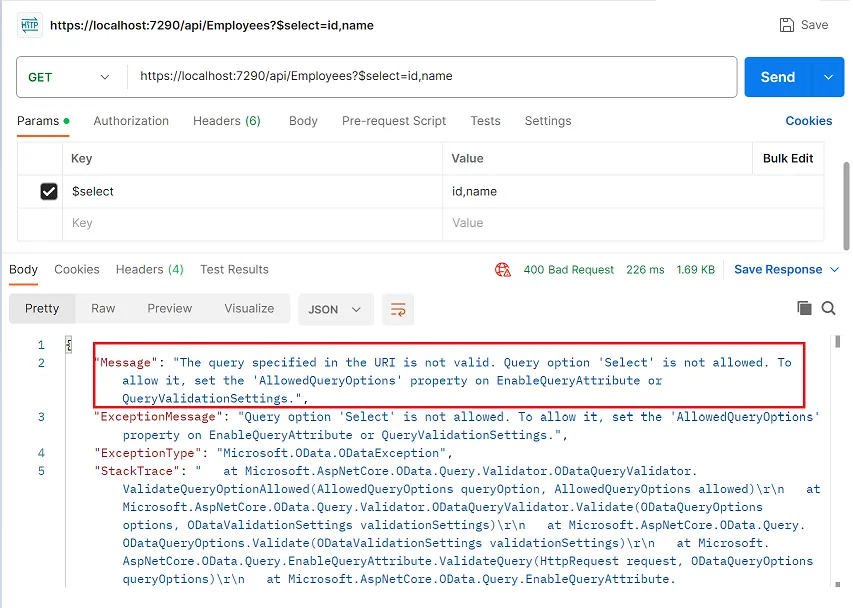
You can put constraints over your query options too. Suppose you do not want the client to access filtering options or skip options, then at the action level you can put constraints to ignore that kind of API request. Query Option constraints are of four types,
AllowedQueryOptions
Example:
[EnableQuery(AllowedQueryOptions =AllowedQueryOptions.Filter | AllowedQueryOptions.OrderBy)]
Above example of the query option states that only $filter and $orderby queries are allowed on the API.
[EnableQuery(AllowedQueryOptions = AllowedQueryOptions.Filter | AllowedQueryOptions.OrderBy)]

public IActionResult Get() => Ok(_employeeService.GetEmployees());
AllowedLogicalOperators
Example:
[Queryable(AllowedLogicalOperators = AllowedLogicalOperators.GreaterThan)]
In the above-mentioned example, the statement states that only greaterThan i.e. “gt” logical operator is allowed in the query, and query options with any other logical operator other than “gt” will return an error. You can try it in your application.
AllowedArithmeticOperators
Example:
[Queryable(AllowedArithmeticOperators = AllowedArithmeticOperators.Add)]
In the above-mentioned example, the statement states that only Add arithmetic operator is allowed while API call. You can try it in your application.
Conclusion
I hope this article gives you a clear picture of implementing the OData in .NET 8.0 and all its functionalities.
Source code:
• GitHub - JayKrishnareddy/OData_API_Dotnet8: Optimizing Data operations with OData in .Net 8.0

